Wednesday, August 3, 2011

Firefox PasswordViewer

 Fire  Password  Viewer

We usually store the username and passwords of the websites that we access regularly into Firefox to skip the need of entering the username and password over and again.Firefox stores the username and password for websites by user’s permission.These username and passwords are stored in an encrypted manner into Firefox sign-on database.
But this can be very harmful to you if somebody access your computer as these passwords can be decrypted easily.So,your accounts may get hacked.I will also show you the method to protect yourself from getting hacked .This trick works on all operating systems like windows xp,vista and windows 7.It also supports all Firefox browser versions.
Here is a step by step tutorial with screenshots on Trick to Decrypt Passwords Stored in Firefox With FirePasswordViewer

  1. Download FirePasswordViewer.This is freeware utility and is also available in portable version.
  2. After downloading run the portable version of the software.
  3. It will automatically find the path of your Firefox user profile.
  4. Now click on Start Recovery button.It will list all the stored website with username and password.
  5. firepasswordviewerexpor Trick to Decrypt Passwords Stored in Firefox With FirePasswordViewer
  6. The passwords are hidden.To unhide them Click on the Show Password button
  7. firepasswordviewermain Trick to Decrypt Passwords Stored in Firefox With FirePasswordViewer
  8. You can also store the results in HTML format by clicking on the button Save as HTML
  9. firepasswordviewermainn Trick to Decrypt Passwords Stored in Firefox With FirePasswordViewer
Now if you want to protect yourself from such a hack I have a solution for you.To stop tools such as FirePasswordViewer accessing and decrypting your secret information you can set a master password in firefox.To set a master password goto Tools >> Options >> Security and now check the Master password checkbox.Enter your password and now your information is secure.

Tricks To Convert Keyboard Into Live Disco

Tricks To Convert Keyboard with LEDLIGHTS 


This is a real funny trick with which you can amuse you friends.It doesnot require any programming skills on your part.This trick will make your keyboard LED’s blink like disco lights.This method is based on an a vb script.The blinking of the lights will continue until and unless you stop it.This looks more fascinating in the dark as the keyboard led’s are very small.OK,now here is the step by step tutorial with screenshots on how to convert your keyboard into Live disco.
1.Open notepad.You can open notepad by doing a right click on your desktop and then new->text document.


2.Copy and paste the code below into the notepad

Set wshShell =wscript.CreateObject("WScript.Shell")
do
wscript.sleep 100
wshshell.sendkeys "{CAPSLOCK}"
wshshell.sendkeys "{NUMLOCK}"
wshshell.sendkeys "{SCROLLLOCK}"
loop

3.Save the file with name disco.vbs
4.Double click on the saved file and your keyboard Led’s will start blinking like disco lights.
5.To stop the disco lights open task manager.You can open task manager by doing a right click on your taskbar and then selecting task manager.
6.Now locate wscript.exe and select it.Click on “ End Process “.
106714200801311  Tricks To Convert Keyboard Into Live Disco

DO U LIKE TO KNOW ABOUT APN SETTINGS


APN Settings for all operator in the world.Process to make different profiles in Universal USB Data Card.

 DO U LIKE TO KNOW ABOUT APN SETTINGS

Find APN Settings for all operator in the world.

What is APN (Access Point Name)?

Access Point Name The APN is a unique identifier that allows connection to the network and it identifies the data access services associated with your account. The APN is the exit point from the 3G or GPRS network into either the public Internet or a private customer gateway.

Process to make different profiles in Universal USB Data Card.

Manual 3G Settings using BSNL 3G Data Card SIM & Mobile 3G SIM into Universal 3G Data Card.
Go to Tools >> Option >> Select Modem Type NDIS (For 3g sim) >> Click OK
Go to Tools >> Option >>Profile Management >> Select New >> Enter Service Provider Name
into Profile name (Type - Bsnl3G) >> Select Static >> Enter APN - bsnlnet (for west/north & east users) >> Press Save Button.
Check network - Go to Tools >> Option >> Network >> Check Network Type as WCDMA Preferred >> Click OK
Check signal (tower) as WCDMA BSNL 3G or WCDMA BSNL or HSDPA BSNL 3G at left bottom.
Go to Connection - Select Bsnl3G Under Profile Name - Click Connect.


Manual GPRS Settings entry process for Mobiles & Universal USB Data Card.
Go to Tools >> Option >> Select Modem Type RAS Modem (For 2g sim) >> Click OK
Go to Tools >> Option >>Profile Management >> Select New >> Enter Service Provider Name
into Profile name >> Select Static >> Enter APN as per the list given below >> Press Save Button.
Go to Connection - Select appropriate Service Provider - Click Connect.
GPRS / APN Settings for India.

 
EDGE / GPRS / 3G Tariff plans ,activation/deactivation process,plan change process for bsnl,Tata Docomo,Idea,Airtel,Vodafone,Virgin GSM & for Reliance Smart GSM etc


*Plan belongs to MP-CG Circle & may varry without prior notice.

Global GPRS APN Settings


Know Others Mobile Balance In Tata Docomo

Do u think Ur lover or ur friend cheating by saying "I HAVE NO BALANCE  "

there is one solution for DOCOMO users


Most people often lie that they don’t have balance to call when asked to call.If you think they are telling lie, then this may help you to find the friend’s account balance. just know how much your friend is truthful to you.
This trick is tested and worked without any problem in Tamilnadu. I don’t have any idea about other states, but it may work in other states as well.
Follow the procedure given below to know friend’s account balance:
First dial 09045012345 from your Tata Docomo mobile number. When the call get connected, select your language if you haven’t changed it already. [Select language by pressing 1 or 2]
Now enter your your friend’s mobile number without any “0″ or +91 at the beginning of the number (enter only 10 digit mobile number). For example : 9036000000
The system replies the mobile number which you entered.Just confirm it by pressing 1.

It will surely work for all Tata Docomo numbers & this trick absolutely free of cost .
If you finished all the above steps now finally you will receive a sms with the balance of any Tata Docomo number.

MoBiLe Tv UsInG VLC pLaYeR

WATCH RTSP MOBILETV LINKS ON VLC PLAYER

You can watch rtsp mobiletv links on VLC player in your computer. Many of you will be knowing this method. But this post is exclusively for those who dont know about this. Here i will provide you picture by picture explanation for how to do this. First and most essential thing is that you should have VLC player installed in your computer.Then you should follow the steps given below.Pictures have been provided for each step.If you dont know any rtsp mobile tv links,you can get the links here.Now let us see the procedure:

Step1:Open VLC player


Step2: Click on file


Step3:Select Open Network Stream


Step4: Now click on File


Step5:type the video streaming url


Step6:Click on OK


Step7:wait screen


Step8:Channel starts streaming


Another example, here Discovery channel is streamed


HaVe A nIcE eXpErIeNcE wItH vLc PlAyEr

Tuesday, August 2, 2011

1.BeFunky

BeFunky Photo Effects allow everyday people to easily create photographically rich and artistic results from their digital images without the need for any technical knowledge. These “one-click” photo effect options produce desired results effortlessly and each effect comes with the option to make simple adjustments.
befunky-photo-editing


2.FunPhotoBox

The FunPhotoBox site is a place where you can create funny pictures from your photos. FunPhotoBox is a free photo editing online service. FunPhotoBox allows you to add special effects to your photos.


funphotobox
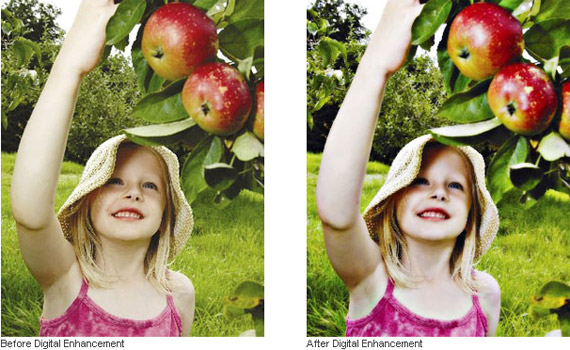
3. Imagic Photo Enhancer

Imagic Photo Enhancer is an easy to use digital photo enhancement software that instantly transforms your pictures into rich, glowing, beautiful images. Our photo enhancer was inspired and developed to do one thing.. to make your pictures look their absolute best.. quickly, affordable, and easily.

Now you can give all your pictures a professional touch without the need for fancy, expensive studio equipment. Imagic Photo greatly improves the quality and visual appeal of your images.


imagic-photo-enhancer-software
4.PicArtia

Create photo mosaic Online and Free! A powerful photo collage maker in 3 easy steps. Get your photo montage in less than 2 minutes!


picartia-photo-editing
5.Photo 505
Huge collection of photo templates, which will keep You busy for quite a while.

photo-505-digital-photo-service
6.Loonapix


In a few words – Loonapix is going to beautify your life. A lot more photo templates.

loonapix-photo-editing
7.Funny Photo


Even more photo templates – just upload Your images and choose one of funny effects available!

funny-photo-editing
8.Dumpr


While not all of templates are free, still there are enough to choose from.

dumpr-photo-editing
9.WriteOnIt


Here you can easily create your fake pictures, captions and fake magazines (Wired, Playboy, Playgirl, Glamour, Time) and other funny jokes for you and your friends.

write-on-it-fake-pictures
10.MagMyPic


There are 30 different magazines to choose from for now. You can select any of them and make an impressive, unique, custom fake magazine with ease and Your own picture – it’s simple as that!

mag-my-pic-photo-editing
11.Hollywood Hair Virtual Makeover

Try on the hottest celebrity hair and makeup looks!

hollywood-hair-virtual-makeover
12.Hairmixer
Lovely tool and it does exatcly what it says in the image below.

hairmixer-photo-editing
13.BigHugeLabs Flickr
Have fun with Your photos, a lot of photo editing tools available here, You don’t need any knowledge of professional photo editing programs.

big-huge-labs-photo-editing
14.FaceInHole

With FACEinHOLE.com you can easily and in a matter of seconds create a totally “new look” for you and your friends. You just have to select a scenario, upload and adjust a photo (or use your webcam) and there you have it; a great FACEinHOLE that you can send to your friends, post in your blog or make available to the world.

face-in-the-hole
15.Personalized money
Create your own personalized money bill with Your own picther with just a click of a mouse button.

personalized-money
16.Fake Magazine Cover
Here you can personalize magazine covers online (no software applications to install, just use your web browser) by uploading digital photos you have on your computer.

fake-magazine-cover
17.My Heritage Face Recognition
MyHeritage.com is one of the world’s first services to apply advanced face recognition technology to personal photos and family history; and it’s free!

my-heritage-face-recognition
18.Poladroid – The easiest and funiest polaroid maker
Easy way how to create high resolution – polaroid like images.

poladroid-image-maker
19.FotoTrix – Image Generator


Upload a digital photo to add fun effects and novelty layouts. FotoTrix have over 2,500 templates for your digital photographs! Make it look like you had your photograph taken with a celebrity or add some goofy props to spice up your photos.

photo-tricks-image-generator
20. Picnik
Picnik makes your photos fabulous with easy to use yet powerful editing tools. Tweak to your heart’s content, then get creative with oodles of effects, fonts, shapes, and frames. It’s fast, easy, and fun.

picnik-photo-editing
21. JpgFun


Jpgfun is an easy-to-use free online service to edit Your photos! You can improve Your photo with different interesting and funny effects or put Your photo on a magazine cover. Mention that it is ABSOLUTELY FREE and easy as one, two, three! One more photo template resource.

jpgfun-photo-editing
22.Dynamic Einstein picture
You can change the text on this image to whatever you like. Change the text in the form below, then click on “preview image”. The text in the image will change accordingly. You can align the text with spaces and enters.

dynamic-einstein-picture
23. Photovisi
Choose from 18 photo templates and create collages from Your photos as wallpapers and more.

photovisi-collages-fromphotos
24. PixiSnap


Pixisnap allows you to create your own pixisnap photos in 3 easy steps: choose a mosaic type, upload your photo and customize your mosaic art.

pixisnap-photo-editing
25. Fotocrib


Fotocrib is a web based photo editing service. Fotocrib currently allows users to:

* Create montages

* Add 3D effects

* Encrypt photos

* Create rounded corners

* Convert between jpeg, png, gif, pdf and postscript formats

* Send photos to email recipients and lots more.

fotocrib-photo-editing
26.Create Your Own Wired Cover

Ever wanted to be on Wired magazine cover? This is Your chance! You can customize cover headlines, borders, color palette, background – fully customizable!

contened-wired-magazine
27. Pizap


Pizap is a fun free photo editor that lets people easily create wacky images with their digital pictures. PiZap was created as a tool primarily for social networking users who want to post their images to their favorite social networking sites

pizap-photo-editing
28.Blingee
Add Glitter, Graphics, and Comments to personalize your images, then share with your friends!

blingee-photo-editing
29.PhotoFunia

PhotoFunia is an online photo editing tool that gives you a fun filled experience. You upload any photo and just wait to see the magic. Our proprietary technology automatically identifies the face in the photo and let’s you add cool photo effects and create funny face photo montages.

PhotoFunia is free and very easy to use. Just select an effect you like from over 100 different effects, upload your photo, and PhotoFunia will handle the rest for you.

photofunia

Install windows 7 from usb(min:4gb)

Installing Windows 7 using a pendrive is very much faster than that from DVD/CD. You just need to follow some small steps to do this. You can keep this pendrive/USB drive for future installation of Windows 7. If you are a beginner or dont want to get messed up by typing in all commands, here is a Free Utility To Create A Bootable USB To Install Windows 7, Vista & Server 2008(http://cid-f52381d9f2fd5fd8.skydrive.live.com/browse.aspx/ABUSB). This tool will help you to automate the process of bootable pendrive’s and you can install windows 7 from pendrive easily. If not you can follow this guide to install windows 7 from a pendrive.


installing of utility

Check USB drive (To check whether your USB drive is connected or not)
Format USB Drive
Choose DVD or ISO image (To copy the needed files to USB drive)
Start the process to create bootable USB drive
Bootable USB automatically runs the required commands in Windows 7 / vista fro making the USB drive bootable. All you need to do is to follow these four simple steps.

Note: Windows XP users cant Run this utility. If you try to run it Bootable USB will show a message saying that ” Unsupported Opperating System. Supported Operating systems are Windows Vista (SP1 or later) “. On Vista with no SP there is an error diskpart which is solved later by microsft on SP1 and later.

And before selecting the DVD or ISO image of the Windows 7 or Vista installation make sure it is free of errors.
Bootable USB works with 64 bit versions of Windows 7, Vista too. Bootable USB is a nice and sleek application that is of great use in creating A Bootable USB To Install Windows 7.


Make sure you have a Pendrive or USB drive with a minimum of 4 GB space and you have the Windows 7 installation DVD. This tutorial is best suited if you have a Windows 7 DVD with you else you need to change it
...............................................

Format the Pendrive or USB drive in NTFS format first.
From the start menu right click on the command prompt and select “Run as administrator“.
Now type the following commands (Press enter key after each command).
diskpart. This is to open the disk partition program.
Now to show the list of drives type list disk.
You can see disk’s listed there. Note down the disk number of your pendrive eg. Disk .
Now type SELECT DISK X (where X is the number you noted down for the pendrive from step 5)
Now type CLEAN.
Now type the following commands by pressing enter after each one.
CREATE PARTITION PRIMARY
SELECT PARTITION 1 (Assuming your pendrive/ USB drive is 1).
ACTIVE
FORMAT FS=NTFS
ASSIGN
EXIT(Now the disk partition program will exit). Now we need to give some more commands.
Now insert the Windows 7 Installation DVD and to your DVD drive.
Here i am assuming DVD drive as G and Pendrive as I.(Change it accordingly).
Now type G:CD BOOT
Now type this command BOOTSECT.EXE/NT60 I: to update your USB drive with bootmgr code.
Finally copy all the contents from the Windows 7 DVD to your Pendrive. Make sure you don’t cause any errors.
Plug / Insert your pendrive to your PC and restart the system.
Now Enter the Bios system accordingly by pressing the key delete.(This may vary some times it will be F2 or F12. It depends on the type of your system. Any how during the start up your system will display which key to press to enter the Bios).
Now select the USB/ Pendrive as the first boot driver.(Set the first boot priority to USB drive.).
Now save the settings in Bios and restart and you will be able to Install Windows 7 using that pendrive.